인턴자동화
[인턴] 모니터링 자동화 프로그램 - 주요 기능 개발 과정 (1편)
류미성
2025년 2월 19일
들어가기 전에
인턴십 미션은 Edu Ops에서 활용할 KDT 모니터링 자동화 프로그램을 구현하는 것이었어요.
KDT는 Zoom을 통해 진행되며, 교육 운영 매니저들이 하루 종일 교육 과정을 모니터링하느라 겪는 어려움을 해소하고, 동시에 교육이 원활히 진행되었음을 증빙할 수 있는 자료를 자동으로 기록하기 위한 목적입니다.
사용자의 요구사항
- 교육 프로그램 시간: 09:00 ~ 18:00 (12:00 ~ 13:00 점심시간 제외)
- 상태표시줄을 포함하여 전체 화면이 보이도록 1분 단위로 화면을 캡쳐
- 캡쳐된 이미지를 jpg나 png 형식으로 Google Drive의 특정 폴더에 자동 업로드
- Google Drive 내 트리 구조 형태로 저장 (예: [과정명] - [기수] - [캡쳐날짜] - 캡쳐파일.png)
고민했던 사항
- 어떤 형태로 서비스를 구현할 것인가? (
실행 프로그램vs웹 페이지)- 결정: 실행 프로그램
- 이유: 브라우저 내에서 시스템 작업(전체화면 캡쳐 등)을 처리하는 것이 어려워 실행 프로그램으로 구현하기로 결정.
- 어떤 언어를 사용할 것인가? (
PythonvsJavaScript)- 결정:
Python - 이유: 실행 프로그램을 만들기 위한 PyInstaller와 다양한 라이브러리 활용을 위해 Python을 선택. Python은 시스템 작업과 자동화에 유리하며, 필요한 라이브러리도 잘 지원됨.
- 결정:
- 로컬에서 저장한 파일을 구글 드라이브에 올릴 때, 폴더 구성과 파일명을 어떻게 할 것인가?
- 폴더 구조는 교육 과정, 기수, 날짜에 맞춰 계층적으로 저장되며, 캡쳐된 이미지 파일은
과정명_기수_날짜_YYMMDDHHMM.png와 같은 형태로 파일명이 지정 - ex) KDT > 클라우드 > 2 > 11 > KDT_cloud_2회차_2501171103.png
- 폴더 구조는 교육 과정, 기수, 날짜에 맞춰 계층적으로 저장되며, 캡쳐된 이미지 파일은
- 코드와 구글 드라이브를 어떻게 연결할 것인가?
- 결정: Google Drive API
- 이유: Google Drive API를 사용하면 파일 업로드가 자동화되고, 파일 관리 및 폴더 구조 설정이 효율적으로 이루어져 구글 드라이브와의 연동을 원활하게 할 수 있음.
Python 라이브러리
- Pillow의
ImageGrab.grab(): 화면 캡처, 자동화 time: 시간 처리, 대기os: 파일 및 디렉토리 관리- tkinter의
filedialog: 폴더 선택 dialog를 띄우고, 선택된 경로 반환 PyInstaller: 독립 실행 파일 생성pydrive: 구글 드라이브 업로드
워크플로우
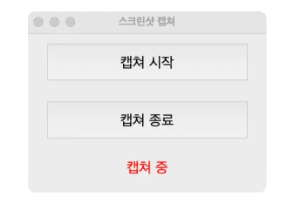
- 프로그램 실행 시 폴더 선택 창이 나타남.
- 선택한 폴더가 없으면 프로그램 종료.
- GUI 창이 나타나고, 기본적으로
캡쳐 대기상태로 시작. - 사용자가
캡쳐 시작버튼을 클릭하거나, 운영 시간이 되면 자동으로 캡처 시작. - 운영 시간이 종료되면
캡쳐 대기상태로 변경. - 사용자가
캡쳐 중지버튼을 클릭하면 즉시 중지. - 창을 닫으면 프로그램이 안전하게 종료됨.
구현 과정
1. 파이썬으로 캡쳐하여 로컬에 저장
-
테스트를 위해 10초마다 화면을 캡쳐하고 로컬에 저장한다.

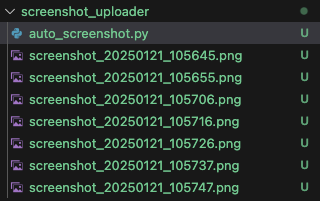
import pyautogui
  import time

  def capture_screenshot():
      # 현재 시간을 기준으로 파일 이름을 지정
      filename = time.strftime("screenshot_%Y%m%d_%H%M%S.png")
      # 전체 화면 캡쳐
      screenshot = pyautogui.screenshot()
      # 파일로 저장
      screenshot.save(filename)
      print(f"Screenshot saved as {filename}")

  # 10초마다 캡쳐 (10초)
  interval = 10

  # 무한 루프로 5분마다 캡쳐 수행
  while True:
      capture_screenshot()
      time.sleep(interval)
2. 폴더를 생성해서 사진을 넣어주는 작업
-
날짜별로 폴더를 생성하고, 해당 폴더 안에 캡쳐된 파일을 저장한다.
20250121폴더가 새로 생겼다.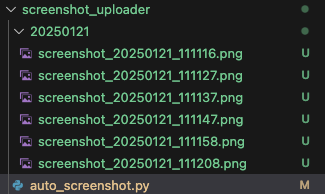
import pyautogui
  import time
  import os

  def capture_screenshot():
      # 현재 날짜를 기준으로 폴더 이름을 지정
      date_str = time.strftime("%Y%m%d")
      # 현재 시간을 기준으로 파일 이름을 지정
      filename = time.strftime("screenshot_%Y%m%d_%H%M%S.png")

      # 해당 날짜의 폴더가 존재하는지 확인하고, 없으면 생성
      if not os.path.exists(date_str):
          os.makedirs(date_str)

      # 전체 화면 캡쳐
      screenshot = pyautogui.screenshot()
      # 파일 경로 지정하여 저장
      filepath = os.path.join(date_str, filename)
      screenshot.save(filepath)
      print(f"Screenshot saved as {filepath}")

  # 10초마다 캡쳐 (10초)
  interval = 10

  # 무한 루프로 캡쳐 수행
  while True:
      capture_screenshot()
      time.sleep(interval)
3. 저장 위치 지정
-
실행 파일 실행 시, 창을 띄워 사용자가 파일 저장 위치를 지정할 수 있도록
tkinter라이브러리를 사용한다.import tkinter as tk from tkinter import filedialog def get_save_location(): root = tk.Tk() root.withdraw() # 창을 숨깁니다 folder_selected = filedialog.askdirectory() # 저장할 폴더 선택 return folder_selected
4. 특정 시간 동안 프로그램 실행 (점심시간 제외)
-
교육 시간 내에만 화면 캡쳐가 이루어지도록 한다.
-
점심시간(12:00 ~ 13:00) 동안은 캡쳐가 일시 정지된다.
def in_operating_hours():
      current_hour = time.localtime().tm_hour

      # # 한국 시간 기준 (KST)
      if (current_hour >= 9 and current_hour < 12) or (current_hour >= 13 and current_hour < 18):
          return True
      return False
5. 실행 파일로 생성
-
PyInstaller를 사용하여 실행 파일을 만들면, GUI에서 프로그램을 더 편리하게 실행할 수 있어, 터미널에 아래 명령어를 입력하여 단일 실행 파일을 생성한다.pyinstaller --onefile --windowed --name "Auto Screenshot" auto_screenshot.py -
하지만, 위의 명령어는 기존
.spec파일을 덮어쓸 수 있어, 직접 파일을 지정하여pyinstaller명령어를 실행하도록 설정했다.pyinstaller auto_screenshot.spec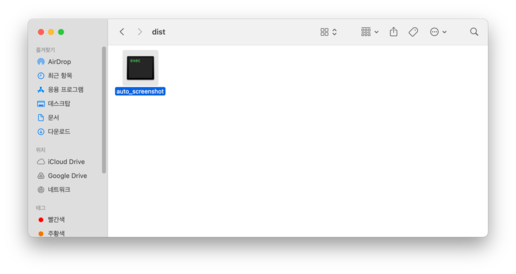
6. 프로그램 실행환경 테스트 (Windows)
[이슈]
- Mac에서 PyInstaller 사용 시
- Mac에서 PyInstaller로 빌드하면 Unix 실행 파일(.out) 또는
.app파일이 생성된다. - 이러한 파일은 macOS에서만 실행 가능하며, Windows에서는 동작하지 않는다.
- Mac에서 PyInstaller로 빌드하면 Unix 실행 파일(.out) 또는
- 온라인 IDE에서 PyInstaller로 빌드 시
- 일반적으로 리눅스 환경에서 실행되기 때문에, 리눅스에서 생성된 실행 파일은 리눅스 바이너리로 만들어진다.
- 이 파일은 Windows에서 실행되지 않는다.
[원인]
- 크로스 컴파일을 통해 다른 운영체제에서 실행 파일을 만들면 호환성 문제가 발생할 수 있다.
- 크로스 컴파일의 한계로
- Mac에서 빌드한 Windows 실행 파일이 일부 기능을 지원하지 않거나, 제대로 동작하지 않을 수 있다.
- Windows에서 실행하려면 반드시
.exe파일 형식이 필요하다.
[해결 방법]
- PyInstaller + Wine을 사용하여 Mac에서 Windows용 실행 파일을 생성할 수 있다.
- 하지만 가장 안정적인 방법은 Windows 환경에서 직접 빌드하는 것이다.
7. 사용성 개선
- 캡쳐 시작과 정지 버튼을 일원화
- 직관적이고 명확한 UI로 사용자 경험 개선.
- 과정명 옵션으로 선택
- 직접 입력의 번거로움 없이 옵션 선택으로 빠르게 설정 가능.
- 일관된 선택으로 오류를 줄일 수 있음.
- 캡처 이미지 해상도 선택 (480p, 720p, 1080p)
- 다양한 해상도 옵션을 제공하여 사용자가 필요에 맞게 선택 가능.
8. MVP 기능 완성

참고자료
이후 작업
아래 블로그에서 이어서 확인할 수 있습니다.